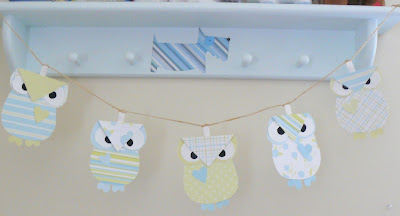
Okay to begin you will need:
cardstock (I used 4x4 double sided pieces that I have-but yours can be any size)
glue dots
white cardstock
black marker
I didn't create a pattern because the imperfection of these makes them extra cute. If you just can't do it on your own, send me a message and I will make you a pattern.
1. To make the body draw a shape that looks similar to this and cut it out:
To make the head you will need to draw a heart and cut it out. I used double sided cardstock because it gives the head two different colors/patterns and I think it looks cool that way. So I recommend using double sided paper for the head for sure.
You will create the head by turning the heart upside down and folding down the point like this:But before you fold anything you will want to create and attach the eyes. They are cut from white cardstock with the black pupil drawn in with marker. Make sure you don't make the black part in the middle, kinda down towards the bottom and in to one side is better.
Attach the eyes with glue dots and then put on large glue dot in the center like so:
Fold down the point and you have created the owls head. Now attach this to the top of the body (the flat part).
To make the feet I cut two small hearts from the scraps from the head and a 3rd larger heart to attach to the body (attach them with mini glue dots).
And now to meet the whole family: (they look a little grumpy but when have you ever seen an owl that looked super friendly?)
If you want to make these into a banner you will want to attach a hanger to each owl. I made mine with a piece of ribbon folded in half and attached with glue dots.
Now I will show you how I attached these to a piece of twine:
1st: string on the last owl onto the piece of twine so it is near the end
2nd: bring the twine around and under itself
3rd: then around and over and under itself again (no it's not just like a "normal" knot-this allows the twine to lay the right way and not make everything all twisty).And there you have it: a cute banner to use as a decoration in a babies room, or for a baby shower, a birthday party, Valentines Day or even a banner of owls made with fall colors would make a great fall decoration.
Hoo doesn't love adorable owls?


No comments:
Post a Comment